Friday, September 7, 2012

Downloading photos from flickr


I thought this might be helpful for people who want to download flickr images using api and can save them some time:
  1. Get an authentication key from flickr: http://www.flickr.com/services/api/misc.api_keys.html
  2. Install flickrapi: http://pypi.python.org/pypi/flickrapi 
    1. The easiest way to do this is using pip: 
      • sudo port install py32-pip(mac only, sudo apt-get install pip for linux?)
      • pip-3.2 install flickrapi ( depending on your pip version change the command.
  3. Run the attached python script with three command line arguments:
    1. Search query to retrieve photos of
    2. Number of photos
    3. Output directory to save to ( The sub-directory structure is similar to flickr's internal directory structure, You can modify the FlickrPhoto class to modify this behavior).
  4. This script uses the tag based search query. The code also has a way to use the search query instead of tag based query(commented out). All special arguments explained in the link for more information: http://www.flickr.com/services/api/flickr.photos.search.html
I copied/modified this code from a friend who in turn copied/modified it from an existing api tutorial. You do not have to cite either of us! :-)

NOTE: THIS CODE WILL NOT WORK UNTIL YOU FILL THE TWO KEYS INSIDE THE CODE. (LINE 47 and 48)

Friday, April 27, 2012

OSAP - Optimal Seating Arrangement Problem

Recently, I went with bunch of folks from my lab to Ormsby's. We were seated in a pretty big table(rectangular) that could host 16 people, we were 12. Each one of us sat arbitrarily(of course fighting for places with eye catching views(girls!)). We started chatting. I talked for a while with people sitting beside me. Then, I tried to talk to people on the opposite side and other folks. There was so much noise that it was very difficult to have any conversation. After shouting at the top of my voice for a while I got tired and just enjoyed my dinner. For the rest of the time I was thinking of this problem and tried to formalize it in my mind. I tried searching for the problem on Google but could not find anything. So, I named it Optimal Seating Arrangement Problem(OSAP). Below I provide the formal description. Anyone wants to propose an algorithm?

OSAP -  Optimal Seating Arrangement Problem

Problem Statement: Design an algorithm to find an optimal seating arrangement for a group of friends of size n on a round table. Each person in the group has a preference for every other person. The preference values lie between 0 and 1. Also, the sum of the preference values for a person's friends should equal to 1. The optimal arrangement is the arrangement with the highest score where the score of an arrangement is calculated by adding the score of individual person and the score of an individual person is sum of the preference values of his neighbors. A neighbor of a person is someone sitting either to the immediate left or immediate right of the person.

Input: n followed by n X n matrix. Row i contains the preference values of person i for every other person in the group.

Example Inputs:
Input: 3
0 0.1 0.9
0.5 0 0.5
0.6 0.4 0

Output:
1 2 3 or 2 3 1 or 3 2 1or 1 3 2 or 2 1 3 or 3 1 2 ( All of them will have equal score in case of n = 3 )

Input: 4
0 0 0.1 0.9
0 0 0.1 0.9
0.5 0.5 0 0
0.9 0.1 0 0

Output:

3 1 4 2 or any permutation ( 1 4 2 3, 4 2 3 1, 2 3 1 4 )

What is the complexity of the optimal algorithm?

Thursday, March 22, 2012

Joint(Cross) Bilateral Filter


I have been meaning to write about this for a while but due to two conference deadlines I did not get time. Anyway it is one of the most interesting things I read and implemented recently which helped immensely in my project. Joint bilateral filter is also referred to as Cross bilateral filter. Both mean the same. Without any further ado let me motivate its necessity and then provide some explanation with results. I will make the matlab, c++ and java code available on my website very soon.

A basic course in image processing will teach you about low pass filtering. In layman's language smoothing. An image is fundamentally composed of two types of frequency components, low and high. Low frequency components signify smooth and constant regions where as high frequency components signify edges and corners. So, a low pass filter passes low frequency components untouched but smoothes the high frequency components. Typically smoothing is a process of convolving a kernel with the image at each pixel location. It is used to reduce noise. The typical kernel is a uniform or a Gaussian kernel. These kernels work very well in general but have issues near edges/boundaries. They induce artifacts because the resulting value after smoothing at the boundary pixel comes from two different regions. The edges are not preserved. Bilateral filter is a technique that can be used to perform edge preserving smoothing. There are variants to this namely anisotropic diffusion. I will not go into details of that in this post. So, in short bilateral filter modifies the kernel based on the local content so that edges are preserved.

Taking it a step further imagine you have two sources and you want to smooth one source based on the similarity of the other source. A typical example is if you have color image and depth image and you want to smooth the color image such that color does not bleed across depth boundaries. That is when you use the joint/cross bilateral filter. Here, the kernel is a combination of weights based on the color similarity and depth similarity. Thus the filter will only smooth values with similar color and depth and keep the rest untouched. This is a simple but elegant solution that has tremendous applications. The application I am interested in and where I used this in my research is to smooth the color image as a preprocessing step to perform over-segmentation.

Below I share three images, the input image, result obtained by smoothing the color image using a Gaussian filter alone and result obtained by using the joint bilateral filter. You can clearly see that the edges are preserved but the rest of the content is smoothed out. Keep in mind that along with the color image I have the corresponding(registered) depth data. Without an additional source of information you can only apply bilateral filter, not cross bilateral filter.


I will discuss about the two papers that are relevant to this in my JiffyPaper blog.

Wednesday, February 29, 2012

Synchronizing(Syncing) Bookmarks, Passwords and even Open Tabs

I am amazed at the extensions and utilities available for browsers these days :-)
I work on three different machines on a given day: My Desktop, Lab laptop and home laptop. One of the many features I wanted was to be able to synchronize my browsers across these machines. They use different operating systems and I end up using either chrome, firefox and sometimes internet explorer. Firstly, I love Chrome because it syncs to my google account which has many uses but the main one being synchronizing bookmarks and extensions across machines.

Then, I added Lastpass another extension that is a password manager. I dont remember passwords to most of the websites as they are automatically generated using Lastpass! Its an amazing tool that will save you a lot of time.

Finally, I found Xmarks another extension that takes synchronization a step further. It synchronizes open tabs across machines! How cool is that? In the lab I can now open tabs that are open on my laptop at home. Its made the entire process of moving across machines so much easier.

I strongly suggest anyone who is looking to deal with synchronizing your work on the browsers across machines to use the following combination: Chrome browser + Synchronize with Google account + Lastpass + Xmarks

!!!The combination is uncanny!!!

Wednesday, February 15, 2012

Opencv knnSearch example

After searching through the web and going through the FLANN api I could not find a decent example that showcases the K nearest neighbor search capability. I found that OpenCV also has a wrapper written around flann so checked if there exists a simple example. To my dismay I could not find one. So, I spent couple of hours and put together the following code. Hope someone looking to use flann with opencv will find this example useful!

The example generates data randomly centered around a mean and a variance of arbitrary dimensions(provided by user, default is 1) and generates query data with similar properties and invokes the single query and batch knnSearch function calls and prints out. Just to let you know its not a class, its just a simple example to help people use knnSearch function in openCV. Enjoy!

code: cvKnn.cpp
Command to compile the code: g++ cvKnn.cpp -L /usr/lib -lopencv_core -lopencv_flann -o cvKnn

Thursday, January 19, 2012

Demosaicing: Normal, edge aware and edge weighted!

Bayer pattern is a common term you will come across while working with a digital camera. Wikipedia does a great job at explaining the Bayer pattern: wiki

Bayer Pattern:
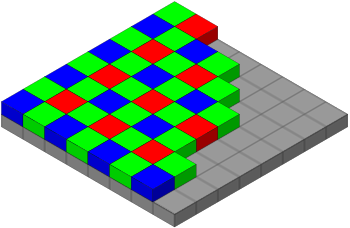
The most straightforward explanation is you have a CCD with three types of photo sensors(red, green and blue). Green are sensitive to luminance and red and blue are sensitive to chrominance(color). Apparently, human eyes are more sensitive to luminance so in a typical CCD you will have twice as many green sensors as the red and blue ones. These photo sensors are arranged in a specific pattern(RGBG, GRBG, RGGB). The raw output(also referred to bayer pattern image) will record only one of the three colors at each photo sensor. Each photo sensor has a corresponding pixel in the image. From the bayer pattern we only have the raw value at each pixel but we want to know the true color(r,g,b). This process of computing the color at each pixel is called demosaicing(or debayering?). A typical arrangement of photo sensors is shown in the image below ( linked from Wikipedia ).


Demoasicing:
There are number of methods out there that do demosaicing and a survey of all the techniques is out of scope of this post. I myself implemented three techniques which are intuitive, computationally less expensive and work reasonably well.

Normal:
This is the first thought that will come to anybody's mind:
For each pixel do bilinear interpolation. So depending on where you are in the pattern the bilinear interpolation will vary. For example in the above image if you are on the green with two reds on top and bottom, you will just take the average of the red value. But, if you are on the blue you will take average of all four neighboring reds etc. This approach works reasonably well but artifacts (aliasing, zippering, purple fringing etc.) show up on the edges. These are quite noticable.

Edge Aware:
Since most of the artifacts are on/near the edges, instead of blindly doing bilinear interpolation you do edge aware interpolation. For example below if you are trying to find the green value at position B, you will only take the average of the green values with smaller gradient. i.e. first you compute the difference of horizontal green values and vertical green values and pick the option with lower difference and take the average of those two green values. This change makes the demosaicing much better.


grgrg
bgBgb
grgrg


Edge Aware Weighted:
Taking it a step further instead of blindly discarding the two green values with higher gradient we take a weigh the horizontal and vertical ones according to the gradient values. Lets define the following:

HDiff = LeftGreen - RightGreen
HSum = LeftGreen + RightGreen
VDiff = TopGreen - BottomGreen
VSum = TopGreen + BottomGreen

Final = 0.5 * (VSum * HDiff + HSum*VDiff ) /  (HDiff + VDiff)

I will leave it to your intuition why 0.5 is needed :-) This small extension is less prone to noise and also keeps strong edges intact.

This drastically improves results. There might be even more fancier ways but for now I fixed my issue so I will research further in future! For comparison purposes I am including the sample images after using the normal(left) and edge aware weighted(right) . Observe across the edges on the chair, board and any other place. You can judge the difference yourself..


Monday, January 16, 2012

Ubuntu 11.10 check battery status hang

I was facing this issue and had no clue how to resolve it. After playing around with grub and various lightdm settings and reading bunch of forums related to the problem I could not resolve it.

I thought it was a longshot but just tried to reinstall the nvidia-drivers and Voilla!! So, for people who faced similar issue, make sure you have the Nvidia driver in one of the folders and boot into text mode(check ubuntu forums on how to modify grub to boot into text mode ) and then reinstall the drivers.
Hope this solves your problem :-)

Saturday, January 14, 2012

Problem with libGL.so on 64-bit Ubuntu


I have an Nvidia card and as expected I installed Nvidia drivers for my ubuntu. But, whenever I compiled programs that used OpenGL ( libGL.so ) I ran into compile errors similar to:

No rule to make target `/usr/lib/x86_64-linux-gnu/libGL.so'

I was sure there was some problem with my libGL.so file so I ended up looking at it properties and found out that it was a broken link pointing to 'mesa/libGL.so' which in turn was pointing to 'libGL.so.1' which never existed.

bpaluri3@bpaluri3:~/libfreenect/build$ ls -l /usr/lib/x86_64-linux-gnu/libGL.so 
lrwxrwxrwx 1 root root 13 2011-08-10 04:20 /usr/lib/x86_64-linux-gnu/libGL.so -> mesa/libGL.so

bpaluri3@bpaluri3:~/libfreenect/build$ ls -l /usr/lib/x86_64-linux-gnu/mesa/libGL.so 
lrwxrwxrwx 1 root root 10 2011-08-10 04:20 /usr/lib/x86_64-linux-gnu/mesa/libGL.so -> libGL.so.1


Then I verified the libGL.so.1 in my /usr/lib directory and found out that it pointed to libGL.so.290.10 which is the file provided by the nvidia driver.

bpaluri3@bpaluri3:~/libfreenect/build$ ls -l /usr/lib/libGL.so.1 
lrwxrwxrwx 1 root root 15 2012-01-09 13:53 /usr/lib/libGL.so.1 -> libGL.so.290.10

I just overwrote the symbolic link in `/usr/lib/x86_64-linux-gnu/libGL.so' with the nvidia openGL library i.e. `/usr/lib/libGL.so' ( I had to delete the old symbolic link before I do this ).

bpaluri3@bpaluri3:~/libfreenect/build$ sudo rm /usr/lib/x86_64-linux-gnu/libGL.so 
bpaluri3@bpaluri3:~/libfreenect/build$ sudo ln -s /usr/lib/libGL.so.1 /usr/lib/x86_64-linux-gnu/libGL.so 

The final two statements are the fixes for the libGL error and I hope anyone who runs into a similar issue will find this information useful.

Wednesday, January 11, 2012

C++: Accessing members of Templated base classes

I spent a considerable time debugging the following error after compiling the c++ code I am writing:


there are no arguments to <function> that depend on a template parameter, so a declaration of <function> must be available


To make the matters simple and to explain what is happening, lets use the following example. I have a base class which is templated, and a derived class that invokes a function from the base class but the function is not "dependent" ( dependent here means the function depends on the type of the template paramter ). In this case foo is not dependent on the template parameter T. The derived class has a function that invokes foo, this call is also not dependent on the template parameter ( there are no arguments that depend on T ).


template class base{
public:
        void foo(int i) {
                // do something with i 
        }
};


template class derived:public base{
        int bar() {
                foo();
        }
};


Again, the call to foo() is not dependent on template arguments (there are no arguments that depend on the type T). This will work only if a global declaration of foo is available, since the one in the base class is not visible until instantiation time, you will get the following compiler error message:

: In member function ‘int derived::bar()’:
error: there are no arguments to ‘foo’ that depend on a template parameter, so a declaration of ‘foo’ must be available
error: (if you use ‘-fpermissive’, G++ will accept your code, but allowing the use of an undeclared name is deprecated)

To solve the problem we have to either use this->foo() or base::foo(). 
You can also compile with -fpermissive flag which allows the compiler to relax the diagnostics for nonconformant code errors to warnings. Its not a good idea though ( for various reasons that I understand but dont have time to explain for now! :-)

In conclusion, Name lookup is a bit tricky because of the two stage approach by the GCC compiler ( apparently since version 3.4 ). The distinction between lookup of dependent and non-dependent names is called two-stage (or dependent) name lookup. Hope this helps someone who get simliar errors.


Friday, January 6, 2012

Windows XP, 7 install cds hangup

I ran into a problem of corrupted partition table when I deleted one of the logical drives on my laptop. I tried to install windows XP and Windows 7 but both cds just froze in the initial setup itself. Having had no clue I tried searching around and found a solution hidden in midst of lot of information. Here is a thing you could do although this will screw up the partition table and in my case I was okay reinstalling stuff without worrying about the data. If that is not the case with you have to find a better way.

I had linux partitions and I just inserted the Linux live cd and formatted the MBR with the following command and voila! 
dd if=/dev/zero of=/dev/sda bs=512 count=1 

Tuesday, January 3, 2012

Clustering - Silhouette, K-means & K-medoids


One of my friend sent out an email asking for suggestion on an algorithm to cluster data given a similarity matrix. And that led to a discussion and another friend forwarded a link to k-medoids algorithm and suggested using it instead of k-means because its more robust to noise etc. But I was still wondering how to find the right k and even if I find the right k is k-medoids better than k-means. I was going to leave it to my friend to figure it out but was too impatient to wait that long.

So, I decided to investigate more and kept reading the wikipedia pages and research papers pertitnent to the topic. Instead of just reading this time I wanted to challenge myself. So, I kept a But, instead of just reading it I wanted to challenge myself. So, I set a 5 hour deadline, to understand, formalize, implement, test, create a video, upload and finally write this blog post on it. I started a timer and boy I was in for a surprise... It took me 6 hours to get everything done :(

There are three advantages I found in doing this.
1) I learnt about the two methods and related work in a quick time, good enough to implement them and know their limitations.
2) A timer countdown helps you focus and ignore everything else instead of just saying I will do this today!
3) Most important, I wanted to see how fast I could transition from basic knowledge to the point of having a running code and beautiful outputs with a good report and finally a blog entry that will stay forever(or till blogspot's existence)

I started on a whiteboard with todo list(image below) and time estimates and within 4 hours got the code working after which I had to spend time on making the video, writing the report, uploading, creating the blog entry etc..


The youtube video of the final output


Report: pdf
Matlab code: code